Your Time has Finished
Which UCAT Exam
are you sitting?
Loading...

AR Position Patterns
Your Score:
Average Score of All Users:
You performed better than of students
Section Breakdown
| Your Score | Average of all Users | Percentile | |
|---|---|---|---|
| Position Patterns |
Position Patterns
Your score:
Average score:
You performed better than of students
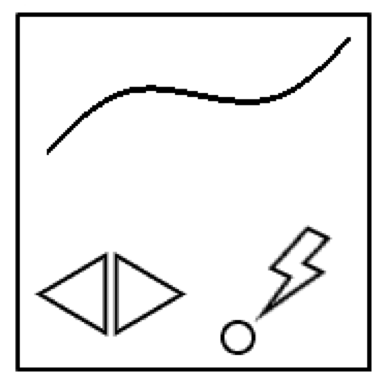
Abstract Reasoning Practice Subtest Instructions
There are 4 different question types in this section of the exam.
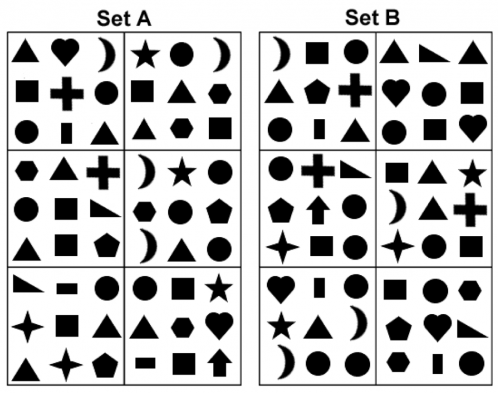
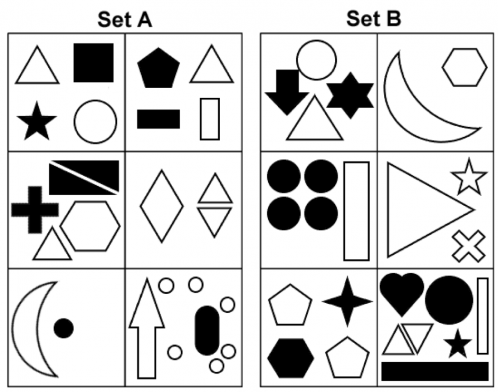
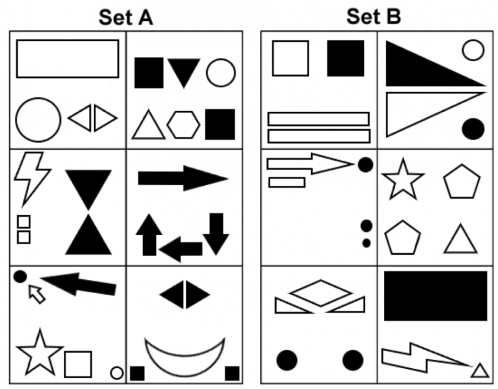
For type 1, you will be presented with two sets of shapes labelled “Set A” and “Set B”. You will be given a test shape and asked to decide whether the test shape belongs to Set A, Set B, or Neither.
For type 2, you will be presented with a series of shapes. You will be asked to select the next shape in series.
For type 3, you will be presented with a statement, involving a group of shapes. You will be asked to determine which shape completes the statement.
For type 4, you will be presented with two sets of shapes labelled “Set A” and “Set B”. You will be asked to select which of the four response options belongs to Set A or Set B.
It is in your best interest to answer all questions as there is no penalty for guessing. All unanswered questions will be scored as incorrect.
Click the Next (N) button to proceed.
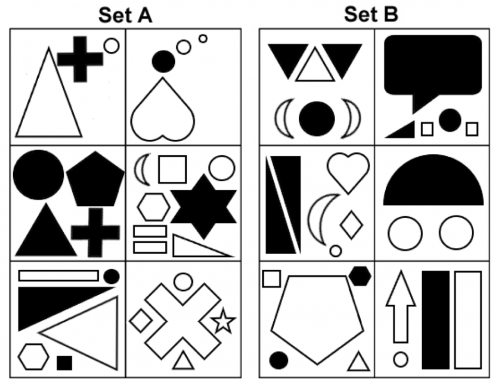
Explanation
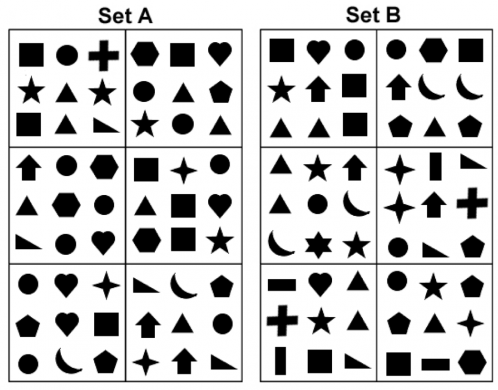
Set A – The hexagon in the top-right has the most sides.
Pattern: In Set A, the element with the most sides is situated in a corner; in Set B, the element with the most sides is situated on an edge.
Method: It should go without saying that Orientation, Colour and Size, and also simple Number, are unlikely to be relevant to the pattern. This leaves Position and Shape/Number. As it happens, the pattern concerns the position of shapes with a particular number of sides. The best way to spot this pattern is by focussing on the unusual shapes first – for instance, the cross only appears once, in a corner, in Set A, but twice, along an edge, in Set B. That said, the Sets are littered with red-herrings. Learning the hierarchy of these shapes by number of sides will help you spot similar patterns in the future.
Explanation
Set A – The cross in the bottom-left has the most sides.
Pattern: In Set A, the element with the most sides is situated in a corner; in Set B, the element with the most sides is situated on an edge.
Method: It should go without saying that Orientation, Colour and Size, and also simple Number, are unlikely to be relevant to the pattern. This leaves Position and Shape/Number. As it happens, the pattern concerns the position of shapes with a particular number of sides. The best way to spot this pattern is by focussing on the unusual shapes first – for instance, the cross only appears once, in a corner, in Set A, but twice, along an edge, in Set B. That said, the Sets are littered with red-herrings. Learning the hierarchy of these shapes by number of sides will help you spot similar patterns in the future.
Explanation
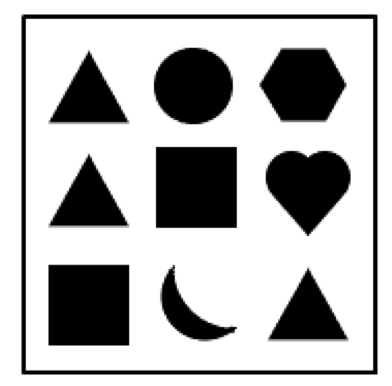
C – The most-sided shape is the octagonal star – but there are copies of it both in a corner and along edges.
Pattern: In Set A, the element with the most sides is situated in a corner; in Set B, the element with the most sides is situated on an edge.
Method: It should go without saying that Orientation, Colour and Size, and also simple Number, are unlikely to be relevant to the pattern. This leaves Position and Shape/Number. As it happens, the pattern concerns the position of shapes with a particular number of sides. The best way to spot this pattern is by focussing on the unusual shapes first – for instance, the cross only appears once, in a corner, in Set A, but twice, along an edge, in Set B. That said, the Sets are littered with red-herrings. Learning the hierarchy of these shapes by number of sides will help you spot similar patterns in the future.
Explanation
C – The most-sided shape is the octagonal star – but there are copies of it both in a corner and along an edge.
Pattern: In Set A, the element with the most sides is situated in a corner; in Set B, the element with the most sides is situated on an edge.
Method: It should go without saying that Orientation, Colour and Size, and also simple Number, are unlikely to be relevant to the pattern. This leaves Position and Shape/Number. As it happens, the pattern concerns the position of shapes with a particular number of sides. The best way to spot this pattern is by focussing on the unusual shapes first – for instance, the cross only appears once, in a corner, in Set A, but twice, along an edge, in Set B. That said, the Sets are littered with red-herrings. Learning the hierarchy of these shapes by number of sides will help you spot similar patterns in the future.
Explanation
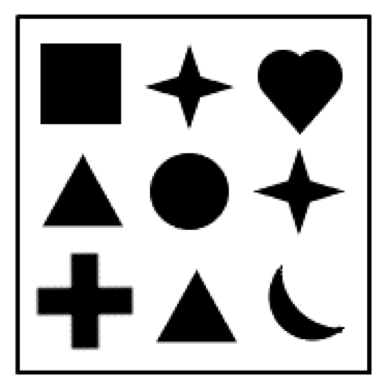
C – The shape with the most sides is the ten-sided star in the central position.
Pattern: In Set A, the element with the most sides is situated in a corner; in Set B, the element with the most sides is situated on an edge.
Method: It should go without saying that Orientation, Colour and Size, and also simple Number, are unlikely to be relevant to the pattern. This leaves Position and Shape/Number. As it happens, the pattern concerns the position of shapes with a particular number of sides. The best way to spot this pattern is by focussing on the unusual shapes first – for instance, the cross only appears once, in a corner, in Set A, but twice, along an edge, in Set B. That said, the Sets are littered with red-herrings. Learning the hierarchy of these shapes by number of sides will help you spot similar patterns in the future.
Explanation
Set B – The circle in the bottom-left has a triangle immediately above it.
Pattern: Members of Set A feature a triangle (either right-angled or isosceles) immediately below a circle. Members of Set B feature a triangle (either right-angled or isosceles) immediately above a circle.
Method: Treat this pattern in a similar manner to the previous pattern, eliminating categories and then trying unusual shapes first. Crosses and ten- or eight-pointed stars appear randomly throughout both sets, whether centrally, along edges or in corners. Equally, arrows, hexagons, pentagons, hearts and crescents do not appear consistently enough to form a pattern. Nevertheless, each box happens to contain at least one triangle and one circle, which should help you towards the answer – the top-left member of each set can be used for helpful comparison, as highlighted in red.
 Hello
Medicmind Tutor
Hello
Medicmind Tutor
Wed, 29 Jun 2022 07:19:38
This was difficult
Bye
Medicmind Tutor
Fri, 15 Jul 2022 16:04:06
yes, this was way to difficult to spot
hard
Medicmind Tutor
Sat, 30 Jul 2022 17:06:31
too spot
jess
Medicmind Tutor
Mon, 12 Sep 2022 18:51:58
not every circle has a triangle above/below though
c
Medicmind Tutor
Mon, 27 Mar 2023 13:18:14
I some how got the pattern for B being a circle is next to a quadrilateral?
Dominic A.
Medicmind Tutor
Mon, 24 Jul 2023 09:42:57
Some of the in both sets have circles below and above. This doesn't make sense.
Explanation
Set B – The circle in the bottom-right has a triangle immediately above it.
Pattern: Members of Set A feature a triangle (either right-angled or isosceles) immediately below a circle. Members of Set B feature a triangle (either right-angled or isosceles) immediately above a circle.
Method: Treat this pattern in a similar manner to the previous pattern, eliminating categories and then trying unusual shapes first. Crosses and ten- or eight-pointed stars appear randomly throughout both sets, whether centrally, along edges or in corners. Equally, arrows, hexagons, pentagons, hearts and crescents do not appear consistently enough to form a pattern. Nevertheless, each box happens to contain at least one triangle and one circle, which should help you towards the answer – the top-left member of each set can be used for helpful comparison, as highlighted in red.
Explanation
C – This box features a triangle with a circle immediately above it, but also the opposite.
Pattern: Members of Set A feature a triangle (either right-angled or isosceles) immediately below a circle. Members of Set B feature a triangle (either right-angled or isosceles) immediately above a circle.
Method: Treat this pattern in a similar manner to the previous pattern, eliminating categories and then trying unusual shapes first. Crosses and ten- or eight-pointed stars appear randomly throughout both sets, whether centrally, along edges or in corners. Equally, arrows, hexagons, pentagons, hearts and crescents do not appear consistently enough to form a pattern. Nevertheless, each box happens to contain at least one triangle and one circle, which should help you towards the answer – the top-left member of each set can be used for helpful comparison, as highlighted in red.
Explanation
Set A – The triangle in the bottom-left has a circle immediately above it.
Pattern: Members of Set A feature a triangle (either right-angled or isosceles) immediately below a circle. Members of Set B feature a triangle (either right-angled or isosceles) immediately above a circle.
Method: Treat this pattern in a similar manner to the previous pattern, eliminating categories and then trying unusual shapes first. Crosses and ten- or eight-pointed stars appear randomly throughout both sets, whether centrally, along edges or in corners. Equally, arrows, hexagons, pentagons, hearts and crescents do not appear consistently enough to form a pattern. Nevertheless, each box happens to contain at least one triangle and one circle, which should help you towards the answer – the top-left member of each set can be used for helpful comparison, as highlighted in red.

Explanation
Set B – The central triangle has a circle directly below it.
Pattern: Members of Set A feature a triangle (either right-angled or isosceles) immediately below a circle. Members of Set B feature a triangle (either right-angled or isosceles) immediately above a circle.
Method: Treat this pattern in a similar manner to the previous pattern, eliminating categories and then trying unusual shapes first. Crosses and ten- or eight-pointed stars appear randomly throughout both sets, whether centrally, along edges or in corners. Equally, arrows, hexagons, pentagons, hearts and crescents do not appear consistently enough to form a pattern. Nevertheless, each box happens to contain at least one triangle and one circle, which should help you towards the answer – the top-left member of each set can be used for helpful comparison, as highlighted in red.
ann
Medicmind Tutor
Sat, 05 Jun 2021 11:44:00
I can't see the question ?
Explanation
C – This features a circle in the top half and a circle in the bottom half.
Pattern: Members of Set A feature at least one circle in the top half of the box; members of Set B feature at least one circle in the bottom half of the box.
Method: Size ought to be your first thought. However, there is no consistent rule relating the largest shapes across each set to Shape, Position, Orientation or Colour. Thus, isolate the top two members of Set A and the middle-right of Set B for comparison. The mixture of black and white shapes is striking, but more so is the preponderance of circles. You can work out the pattern from these simpler cases and test it across the other members of each set.
Explanation
C – This contains no circles.
Pattern: Members of Set A feature at least one circle in the top half of the box; members of Set B feature at least one circle in the bottom half of the box.
Method: Size ought to be your first thought. However, there is no consistent rule relating the largest shapes across each set to Shape, Position, Orientation or Colour. Thus, isolate the top two members of Set A and the middle-right of Set B for comparison. The mixture of black and white shapes is striking, but more so is the preponderance of circles. You can work out the pattern from these simpler cases and test it across the other members of each set.
Explanation
Set A – This contains one circle, which is in the top half of the box.
Pattern: Members of Set A feature at least one circle in the top half of the box; members of Set B feature at least one circle in the bottom half of the box.
Method: Size ought to be your first thought. However, there is no consistent rule relating the largest shapes across each set to Shape, Position, Orientation or Colour. Thus, isolate the top two members of Set A and the middle-right of Set B for comparison. The mixture of black and white shapes is striking, but more so is the preponderance of circles. You can work out the pattern from these simpler cases and test it across the other members of each set.
Explanation
C – This circle is equally distributed between the top and bottom halves.
Pattern: Members of Set A feature at least one circle in the top half of the box; members of Set B feature at least one circle in the bottom half of the box.
Method: Size ought to be your first thought. However, there is no consistent rule relating the largest shapes across each set to Shape, Position, Orientation or Colour. Thus, isolate the top two members of Set A and the middle-right of Set B for comparison. The mixture of black and white shapes is striking, but more so is the preponderance of circles. You can work out the pattern from these simpler cases and test it across the other members of each set.
Explanation
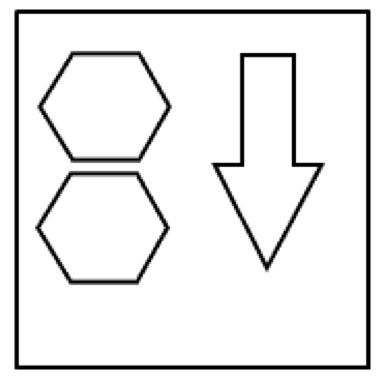
Set B – The arrow has seven sides to the hexagons’ six each, and is on the right-hand side of the box.
Pattern: In Set A, the shape with the most sides is situated in the left half of the box, whereas in Set B, it is situated in the right half of the box.
Method: The simplest cases, for comparison, are the bottom-left of Set A and the top-right of Set B. Both have a white crescent as their largest shape, situated mainly in the left-half of the box – clearly, Size is not a factor here, nor Colour. This pattern succumbs well to looking for unusual shapes across both sets, namely the ten-pointed star in the top-left and the cross in the middle-left of Set A, and the twelve-pointed star in the top-left of Set B. Focussing on the wide occurrence of stars should help you to notice the connection between Shape (Number of sides) and Position.
Explanation
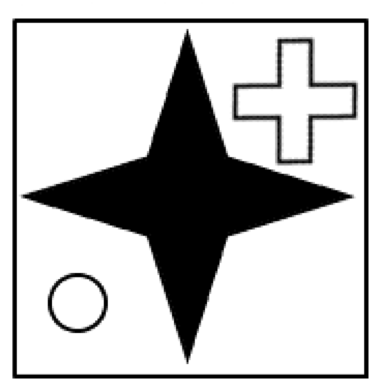
Set B – The twelve-sided cross is on the right-hand side of the box.
Pattern: In Set A, the shape with the most sides is situated in the left half of the box, whereas in Set B, it is situated in the right half of the box.
Method: The simplest cases, for comparison, are the bottom-left of Set A and the top-right of Set B. Both have a white crescent as their largest shape, situated mainly in the left-half of the box – clearly, Size is not a factor here, nor Colour. This pattern succumbs well to looking for unusual shapes across both sets, namely the ten-pointed star in the top-left and the cross in the middle-left of Set A, and the twelve-pointed star in the top-left of Set B. Focussing on the wide occurrence of stars should help you to notice the connection between Shape (Number of sides) and Position.
Explanation
C – All shapes, regardless of side number, are evenly distributed.
Pattern: In Set A, the shape with the most sides is situated in the left half of the box, whereas in Set B, it is situated in the right half of the box.
Method: The simplest cases, for comparison, are the bottom-left of Set A and the top-right of Set B. Both have a white crescent as their largest shape, situated mainly in the left-half of the box – clearly, Size is not a factor here, nor Colour. This pattern succumbs well to looking for unusual shapes across both sets, namely the ten-pointed star in the top-left and the cross in the middle-left of Set A, and the twelve-pointed star in the top-left of Set B. Focussing on the wide occurrence of stars should help you to notice the connection between Shape (Number of sides) and Position.
Explanation
C – The squares have the most sides but there’s one in each half.
Pattern: In Set A, the shape with the most sides is situated in the left half of the box, whereas in Set B, it is situated in the right half of the box.
Method: The simplest cases, for comparison, are the bottom-left of Set A and the top-right of Set B. Both have a white crescent as their largest shape, situated mainly in the left-half of the box – clearly, Size is not a factor here, nor Colour. This pattern succumbs well to looking for unusual shapes across both sets, namely the ten-pointed star in the top-left and the cross in the middle-left of Set A, and the twelve-pointed star in the top-left of Set B. Focussing on the wide occurrence of stars should help you to notice the connection between Shape (Number of sides) and Position.

Explanation
Set A – The pentagon on the left has the most sides.
Pattern: In Set A, the shape with the most sides is situated in the left half of the box, whereas in Set B, it is situated in the right half of the box.
Method: The simplest cases, for comparison, are the bottom-left of Set A and the top-right of Set B. Both have a white crescent as their largest shape, situated mainly in the left-half of the box – clearly, Size is not a factor here, nor Colour. This pattern succumbs well to looking for unusual shapes across both sets, namely the ten-pointed star in the top-left and the cross in the middle-left of Set A, and the twelve-pointed star in the top-left of Set B. Focussing on the wide occurrence of stars should help you to notice the connection between Shape (Number of sides) and Position.
Explanation
Set A – This has three shapes in the bottom half.
Pattern: Members of Set A have three shapes in the bottom half of the box, whilst those of Set B have two shapes in the bottom half of the box.
Method: As usual, this Position-based pattern is not easy to spot. Nevertheless, isolating simpler cases remains a sound strategy, such as the top-left of Set A and the middle-right of Set B, both of which contain only white shapes. Here, each case contains four shapes, exactly two of which are the are, exactly one of which has an even number of sides, and where the shape with the most sides is in the top half of the box. However, the 1:3 vs. 2:2 split between top and bottom is striking, and should lead you to the pattern. It may also help you to notice the overall appearance of the members of each set, with their clear delineation between top and bottom halves.
M. Noble
Medicmind Tutor
Thu, 23 Sep 2021 13:48:50
trash pattern
b
Medicmind Tutor
Mon, 22 Nov 2021 01:00:18
stoopid shit
fck medicmind
Medicmind Tutor
Sat, 30 Jul 2022 17:26:58
get medify its much better
Explanation
C – There are four shapes in the bottom half.
Pattern: Members of Set A have three shapes in the bottom half of the box, whilst those of Set B have two shapes in the bottom half of the box.
Method: As usual, this Position-based pattern is not easy to spot. Nevertheless, isolating simpler cases remains a sound strategy, such as the top-left of Set A and the middle-right of Set B, both of which contain only white shapes. Here, each case contains four shapes, exactly two of which are the are, exactly one of which has an even number of sides, and where the shape with the most sides is in the top half of the box. However, the 1:3 vs. 2:2 split between top and bottom is striking, and should lead you to the pattern. It may also help you to notice the overall appearance of the members of each set, with their clear delineation between top and bottom halves.
Explanation
Set A – This has three shapes in the bottom half.
Pattern: Members of Set A have three shapes in the bottom half of the box, whilst those of Set B have two shapes in the bottom half of the box.
Method: As usual, this Position-based pattern is not easy to spot. Nevertheless, isolating simpler cases remains a sound strategy, such as the top-left of Set A and the middle-right of Set B, both of which contain only white shapes. Here, each case contains four shapes, exactly two of which are the are, exactly one of which has an even number of sides, and where the shape with the most sides is in the top half of the box. However, the 1:3 vs. 2:2 split between top and bottom is striking, and should lead you to the pattern. It may also help you to notice the overall appearance of the members of each set, with their clear delineation between top and bottom halves.
Explanation
Set B – This has two shapes in its bottom half.
Pattern: Members of Set A have three shapes in the bottom half of the box, whilst those of Set B have two shapes in the bottom half of the box.
Method: As usual, this Position-based pattern is not easy to spot. Nevertheless, isolating simpler cases remains a sound strategy, such as the top-left of Set A and the middle-right of Set B, both of which contain only white shapes. Here, each case contains four shapes, exactly two of which are the are, exactly one of which has an even number of sides, and where the shape with the most sides is in the top half of the box. However, the 1:3 vs. 2:2 split between top and bottom is striking, and should lead you to the pattern. It may also help you to notice the overall appearance of the members of each set, with their clear delineation between top and bottom halves.
Position Patterns Review Screen
Instructions
Below is a summary of your answers. You can review your questions in three (3) different ways.
The buttons in the lower right-hand corner correspond to these choices:
1. Review all of your questions and answers.
2. Review questions that are incomplete.
3. Review questions that are flagged for review. (Click the 'flag' icon to change the flag for review status.)
You may also click on a question number to link directly to its location in the exam.
Position Patterns Section
Final Answer Review Screen
Instructions
This review section allows you to view the answers you made and see whether they were correct or not. Each question accessed from this screen has an 'Explain Answer' button in the top left hand side. By clicking on this you will obtain an explanation as to the correct answer.
At the bottom of this screen you can choose to 'Review All' answers, 'Review Incorrect' answers or 'Review Flagged' answers. Alternatively you can go to specific questions by opening up any of the sub-tests below.
Position Patterns Section
TI-108
Sat, 18 Sep 2021 20:32:45
That's not true for set A middle right element?
Mon, 20 Sep 2021 05:45:27
It is correct though the shape in the corner has the most sides (the star)
Wed, 22 Sep 2021 09:57:41
trash pattern
Mon, 07 Mar 2022 15:04:15
How are you supposed to get this in a few seconds
Fri, 17 Jun 2022 09:48:10
stoopid
Sun, 19 Jun 2022 19:43:51
I do not understand your explanation and also how are you supposed to get this in a few seconds?